Monday, December 15, 2014

Burlap Christmas Trees

This is a repost from 2012. I thought it was good enough to share once more. 

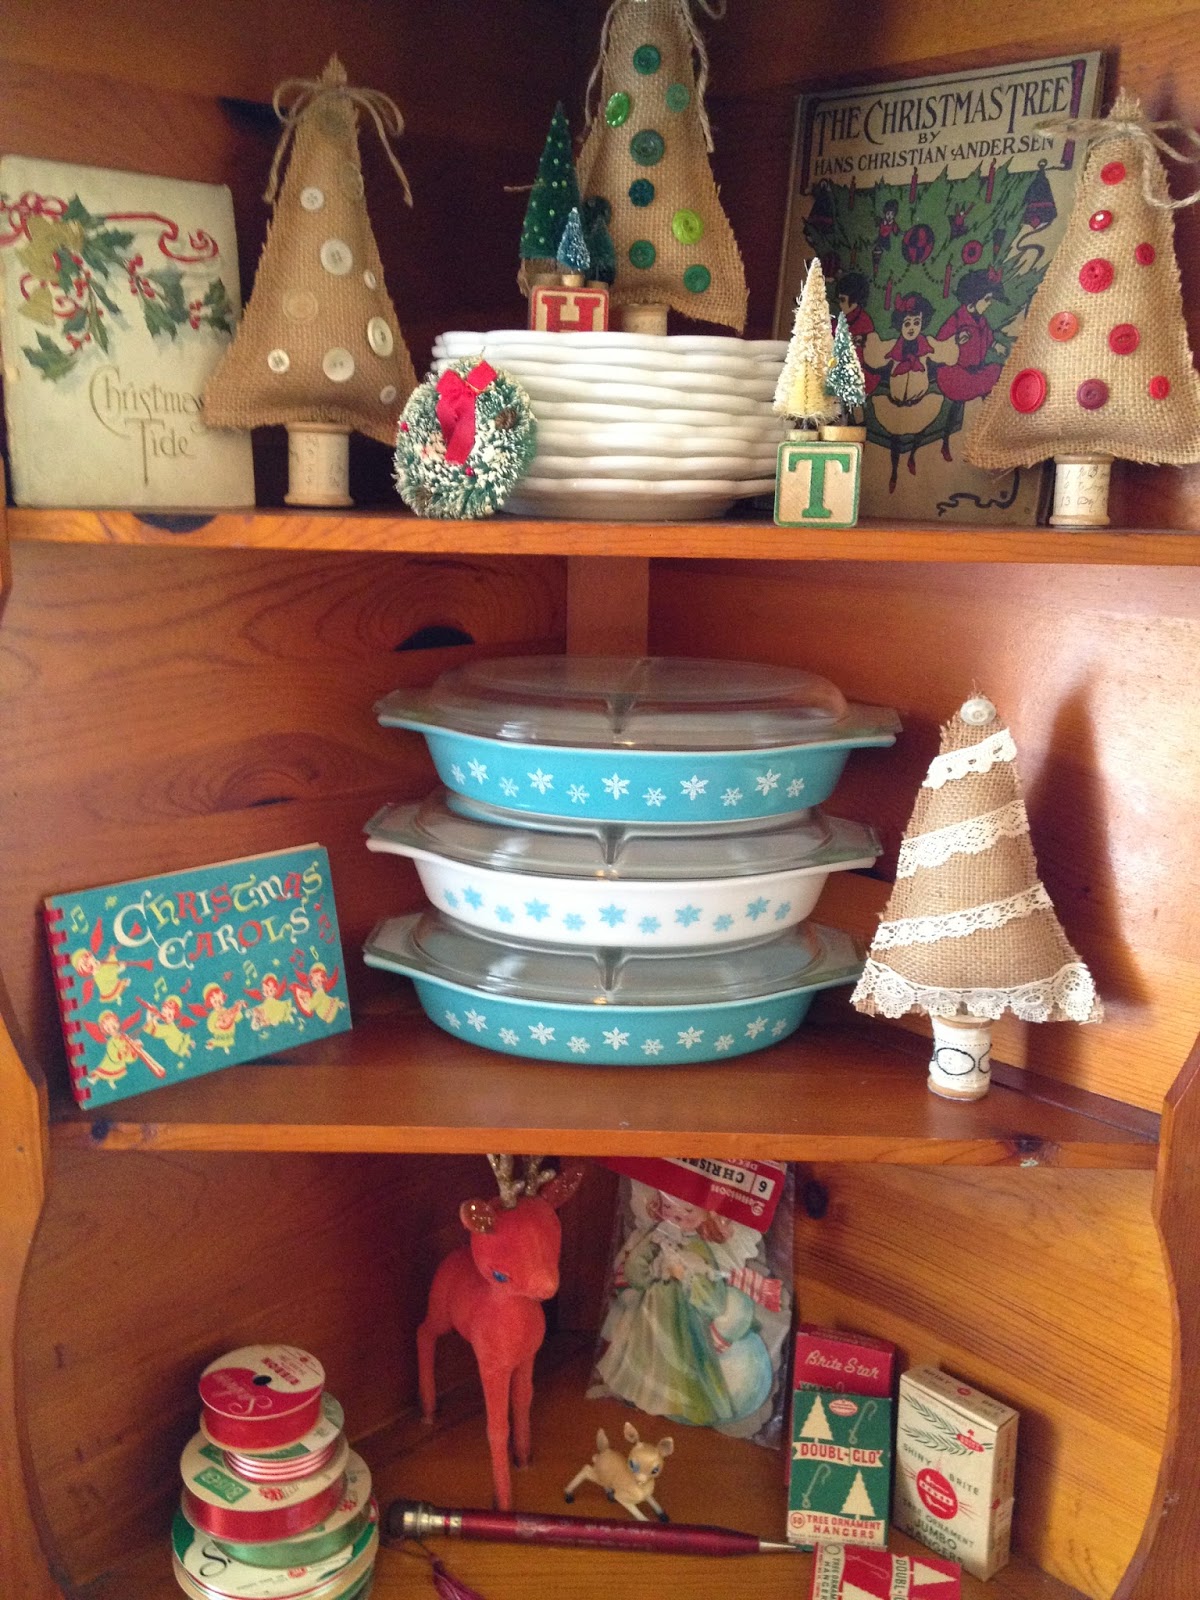
A few years ago I made several things out of burlap. My favorite of all of those projects was these little fabric trees. This idea was one that I came up with on my own and it is one of my craft projects that I am the most proud of. I still receive compliments from friends about these trees when they are taken out of storage and put on display for the season.

The trees are fairly easy to make. I am not an excellent seamstress to say the least, so if I say that these are easy then you can trust me. To make them I used tan & red burlap and decorated them with various vintage buttons and laces. That is the funnest part - choosing how the tree will be embellished! The trunk of each tree is a wooden thread spool.

Burlap isn't the only fabric that you can use. I also made trees out of some old bedspreads I had on hand. (shown below). The white tree is made of chenille.

I'm sharing how I made these in case you are interested in trying one yourself. Although it is much easier to buy someone a gift - I believe that making something with your own hands as a gift for someone else is such a sweet expression of love and kindness. With time at a premium, spending time to make something shows the recipient that you care enough about them to give of your time and talents. Trust me when I say that a handmade gift will be cherished for years to come much more so that something bought at a store.


Chenille & green tapestry fabric - both found at a yard sale.


I didn't take any pictures showing these being made but I can give you some simple directions if you want to try making these on your own.

You will need:
Fabric of choice
12" piece of 20 gauge wire
1 wooden thread spool
small piece of felt
Hot Glue
Laces, buttons & trims for decorating

To begin I drew a triange/tree shape - on a piece of paper and used that as my pattern. Make it as small/large as you like. I traced the pattern onto the material. Cut two pieces of material for each tree. Sew the two pieces together - leaving an opening for stuffing the tree later. For the burlap I sewed the pieces together WRONG sides together and just trimmed the material close to the seem when finished - leaving a raw edge. For the other materials I sewed the trees RIGHT sides together and then turned them right side out when sewn. Stuff the trees with fiber fill. I then inserted a wire into the center of each tree - sort of like a trunk. The wire should stick out about an inch from the bottom of the tree. Sew material closed - keep the wire sticking out.

Now, take your wooden spool and cut a piece of felt to cover the bottom of the spool. Attach with glue. Now fill the hole in the spool with hot glue. Insert the wire from the tree into the hot glue - this keeps the tree stable enough to stand on it's own. Let dry. You can now decorate the tree with trims, ribbons & buttons as you wish. I also decorated my wooden spools with paper, twine & ribbons.

If you check my post Christmas 2014 you will spy my trees on display. They come out each year and I love them just as much today as I did when I made them.

Merry Christmas!
KayteeJane

Pin It

Best Blogger Tips

Tuesday, December 9, 2014

Christmas Decorations 2014

Hi Friends!
It's been quite a while since I posted. Let me begin by saying thank you for stopping by after all of this time. I am still alive and still loving the hunt for vintage treasures.

Here are some of the Christmas decorations that are on display around the house this year. Over the past few years I have been slowly weeding through my decorations and keeping only those things that I love. I don't know about you, but do your taste's change like mine do? I have gone mostly all vintage in my decorations, parting with the rest. Although I love a lot of what I see at Target, I still prefer the old to the new. My year round collections have been put away to make room for the holiday decor. Although I still do not have my tree decorated - it is sitting in the stand waiting for some attention, here is a peek at some of the rest. 


May your Christmas be filled with Joy this year.

If you want to see a lovely Flocked Tree decorated in pastel sweets - stop over to my blog friend Heather's blog by clicking HERE.

KayteeJane

Pin It

Best Blogger Tips

Tuesday, August 19, 2014

Hoop Art


For several years now Hoop Art has been all over the internet. I think I first saw the idea years ago on the delightful blog Posy Gets Cozy. I googled it when writing this post and the picture appeared. I love how she makes fabric into art with a simple embroidery hoop!


Since I first saw that picture it seems like the popularity of hoop art has exploded. Creative women everywhere are making something unique with fabric and a hoop. Maps, sweaters, quilts, old t-shirts, burlap, vintage linens, embroidery, lace - it is made all the more lovely when framed in a hoop and hung for display.

I see hoops for sale all of the time at thrift stores and yard sales. They are so reasonable. I recently priced a new hoop at Michaels and almost fainted when I saw the price. Something like $12.99. When you are used to seeing them for sale at GW for around a quarter, full retail will knock you over every time.

A while back I found this super cute handmade baby bib at an estate sale.


The minute I saw it I thought it would be adorable framed in a hoop. I pictured a sweet Italian grandmother making this for her chubby-cheeked Italian grand baby. All I know is that my favorite comfort food of all time is Spaghetti {a.k.a. spaghette} I am Italian myself and I loved my Italian grandma. This bib begged to be framed and hung in my kitchen. So after holding on to it for a good 2 years with the intention of doing something with it, I finally did.

Here is how I did it in case you get struck with embroidery-hoop-fever and want to try your hand at it. It is a great way to use those sweet embroidered table scarves and such that you can find for pennies on the dollar at church sales and thrift shops that are too cute to leave behind but once you get them home you can't figure out what to do with them.

You will need 1 embroidery hoop, scissors and some hot glue. I opted to spray paint my hoop to match the embroidery but you don't need to do that step if you don't want to.


Split the hoop apart and lay the larger of the two hoops on the top of your fabric and the smaller of the two pieces under the fabric. Line up your fabric in the hoop as you would like to it be when finished.


 Next push the two hoops together and pull the fabric taut. It should be as tight as a drum. When you get it nice and smooth and taut tighten the brass screw at the top that holds the two hoops together.


Make sure it is where you want it to be before moving on to the next step.


Flip the hoop over to the "back side". If the fabric is where you want it to be trim the excess off leaving about an inch of fabric peeking out from between the two hoops.


Run a line of hot glue on the inside surface of the wood and then fold the excess fabric over the wood so that it sticks to the glue.


Now the back is neat and tidy and the cut fabric will not show when the hoop is hung. The glue keeps the fabric secure.


If you want to go one step farther, buy a piece of felt at the fabric store and cut it to the same diameter as the smallest hoop. When your hoop art is framed glue your piece of felt to the back of your work so that the back side of the embroidery {or fabric} is covered and doesn't show. I didn't get around to doing this step.

Here is the finished hoop hanging in my kitchen.


On a side note - I probably used a hoop that was a tad too large for the bib. As a result some of the red seam binding is showing. I used a size 14 because I found one for cheap at a sale and didn't want to purchase a new 12" hoop for full price. I have intentions of gluing some rick rack or something around the face of the hoop to cover that seam binding that is peeking through. {My OCD kicks in whenever I look at it and realize it isn't perfect.} I am however glad that I did at least get it framed and hung!

I hope you will try some hoop art for yourself and recycle some beautiful old embroidery or pretty fabric from your stash.

KayteeJane


Pin It

Best Blogger Tips

Thursday, July 3, 2014

Summer Decorating with Vintage

 I love to decorate around the house with vintage items. I change the decorations for each season/holiday. Here are some of my summer decorations.

I collect old planters. I put this Uncle Sam planter out for the 4th of July every year. Here it is filled with vintage flags.


Something my husband and I will always buy if affordable are vintage fans. We love them and use them throughout the house in the summer. Since we don't have air conditioning, these vintage fans really come in handy. Some of the fans are strictly for display, like this one. I recently found this small-sized fan at a garage sale. I love the name of it - Zero. I think it is cute sitting out for summer. The colors are great too.


This metal toy lawn mower was just purchased last Saturday at a yard sale. I have always loved vintage toys for some reason. I love to use old toys and children's furniture in my displays. The lawn mower is on my front porch.


Another thing I decorate with is vintage household items in their original packaging. You can find things like this at estate sales.  I found both the package of plastic forks and the pack of Ice Cream Sticks at estate sales. I especially like it when the packages have the original prices. It is neat to see how much stuff cost 40 or 50 years ago. I just sit things like this out on my china cupboard or in my kitchen and they add interest.


I also like to decorate with vintage linens. I found this amazing embroidered linen doily at a yard sale years ago. Since I have two daughters that are obsessed with anything mermaid, I had to have it. I always thought it would look cute made into a pillow or just sitting as a doily on the top of a little girl's dresser.


I also like keeping vintage books. This is an old book from 1960 discarded from a local elementary school.


Since my kids don't seem to know too much about American History - which I discovered when I asked them why we celebrate the 4th of July - I made Hannah sit and read some of this book.


This summer I joined a CSA in my community. CSA stands for Community Sponsored Agriculture. Here is my weekly share of eggs - sitting in Pyrex. I am always using my Pyrex bowls in the kitchen no matter what the season. I even change which bowls I use to match the colors of the particular season or holiday I am celebrating. That is how crazy I am for Pyrex.


I love the freckles on the eggs!


Here's wishing you a happy 4th of July and fun summer days ahead!
KayteeJane


Pin It

Best Blogger Tips