Thursday, November 29, 2012

Gifts from the Thrift

Each Christmas I try to make many of the gifts that I give instead of buying them. I do this for two reasons. One, to save money and two, because I enjoy doing something special and personal for the people on my list.  I really enjoy creating gifts and it satisfies the creative person inside of me.

With a dollar having to stretch longer than it ever has, I am coming up with several ideas of simple & easy gifts that can be made on a budget. I am planning on sharing all of my ideas here on my blog over the next weeks. Today I am showing gifts you can put together using things that can be bought in just about any thrift store. I do not think these gifts are tacky or sacrifice style at all, just because some parts of them came from a thrift store. In fact I think they turned out very nice and I know I would be happy receiving any of these things. And by making gifts like these instead of buying "new", we are doing something good for the environment by reusing. So be unique! I challenge you to try one of these ideas for someone on your list - a teacher, a friend or a neighbor perhaps?

Project #1 - Forced Bulbs

(Click on picture for original souce.)

I love forcing tulip and paperwhite bulbs. Here in Pennsylvania they are a welcome bit of color and freshness during the winter months. Forced bulbs make nice gifts too. You can buy a pre-made gift package for forcing bulbs from Target complete with a pottery dish & bulbs. However, since I like to do things my own way I am going to make these myself using vintage & recycled containers and for a lot less money!

At thrift stores look for glass & pottery bowls, planters & dishes that would be good for forcing bulbs. Here are some pottery planters that I have collected.


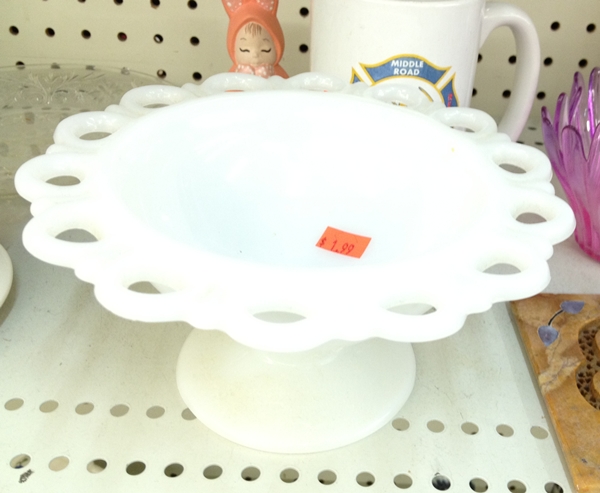
Milk glass is a beautiful container for paperwhites. At my trip to the thrift last week I spotted this milk glass dish for $1.99.


Here are some other containers that I have collected - all of which would work to hold the bulbs. The more unique the better. Think outside the box.


To make the gift, you will need some rocks or stones for the bottom of the container. I found these bags at Dollar Tree for a dollar each. You will mostly likely need one bag of rocks for each container you are using unless it is a larger container and then you will need two.


Look around at discount stores or gardening centers for packs of bulbs. I found these red tulip bulbs for $2.50 a package. There are 8 bulbs in a pack - enough to make 2 or 3 gifts.


Fill the bottom of your container with the rocks. Place the bulbs on the top of the rocks nestled in so that they don't fall over. If you do this now (a month before you give the gift) you can begin to grow these at home and then give the gift with the flowers in bloom. If you decide to do that, add water to your rocks (not overflowing) and place the dish in a sunny/warm location. The flowers will begin to grow. OR you can wait and give the gift with the bulbs just starting. If you do this, don't add water. Just package the bulbs as shown below. Doing it this way is nice too because the recipient can then grow their own flowers in January when we all need a little bit of spring to brighten the days.


Here is one bulb packaged in a vintage drinking glass. I used clear pebbles for this one.
 
 
Remember that once the bulbs are done growing the gift recipient can keep the container for later use and also plant the bulbs in their garden!

Each of these gifts cost me less than $5 each.

Idea #2 - Beautiful Soap Dish

I love antique dishes. I frequently see singles - ones that don't come with a complete set - for sale at thrift stores & antique stores.I use a pretty antique plate as a soap dish in both my kitchen & bathroom. Here are two dishes that I am using for my gifts.


For my gift I am buying handmade soap to go with the dish. My friend Julie made the tree shaped Spruce soap shown below. I love how it looks on the red and white transferware plate. If you can't find any handmade soap, TJ Maxx and Marshalls sell great soaps at reasonable prices.

This gift cost me $5.


Idea #3 - Drinks with Style

Glassware abounds at the thrift store. Much of it is in great shape and sells for pennies on the dollar. If you are going to dinner at someone's house and typically bring a bottle of wine, why not pair it with some nice wine glasses that you found at the thrift store. I have no misgivings about buying glassware second hand. I look it over to check for chips and scratches. If it looks good then I know I can take it home and put it in my dishwasher to get it nice and clean.

When shopping for glassware, keep your options open to what may be available at the thrift store and then base your gift around what you found. Just last week I saw these Margarita glasses for sale. Package these along with some Margarita salt and Margarita mix for a cute gift.


I also saw these. I thought they were pretty cute with their hobnail base. They only cost 39 cents each. I would pair several of these glasses with a bottle of champagne. - This would make a nice New Year's gift.


I also saw these. Very retro! I'm thinking Mad Men all day. These would be great along with a bottle of flavored liquor, whisky or what you would need to make a martini. Include some cocktail stirrers and some fun paper cocktail napkins. Only 99 cents each for beautiful vintage glasses!


If you don't want to do alcohol, how about a Root Beer Float Basket? I found these small-sized beer mugs at the thrift store. I bought these red & white straws at Dollar Tree in the Christmas aisle.


Pair the glasses and the straws with some ICB Root Beer and a pint of good vanilla ice cream for a sweet gift idea - all for about $10 if you include the ice cream & root beer.


If you are crafty, here is an idea that I saw on Pinterest last year. You could do this with any stemmed glassware.
(Click on the picture for the original link.)

Idea #4 - Food Packaging

You can find a great assortment of glass containers at the thrift store that would be beautiful for holding your home baked cookies, fudge, snack mix or candy. Much prettier than a disposable foil or plastic container and much cheaper than buying new. Fill with your homebaked goodies and tie with a ribbon.

Here a some examples of containers found at thrift stores or antique stores that would be beautiful for packaging food:


Look for glass cake plates to hold fruit cake. Glass jars to hold snack mix or cookies. Tins to hold candy or fudge. Loaf pans or vintage Pyrex to hold a loaf of bread or a cake.

So there you have it. I hope you have been insired to shop at your local thrift store this holiday season to find gifts for the people on your list. You will be helping the environment, helping the charity that runs the thrift store & helping your wallet. Not to mention you will be giving a gift that is unique and one of a kind.

If you have any other ideas of gifts from the thrift - please share them with us in the comments. I would love to hear what ideas you have!

Next time...how many gifts can you make from an old wool sweater? Join me to see what I come up with!

KayteeJane


Pin It

Best Blogger Tips

Tuesday, November 20, 2012

Thrift Store Shopping

I decided to go to the thrift store today. Mind you I have a ton of things to do at home to get ready for Thanksgiving - like cleaning and cooking, but I chose instead to go to the thrift!

The reason is I'm coming up with several ideas for gifts that can be made using items found at the thrift store. I'll be sharing these ideas in an upcoming blog post. Of course, as is usually what happens when I go to the thrift store, I bought a few things for myself. At least they were cheap and didn't set me back too much.

I found these cute Pyrex baking dishes.


The dishes with the red/pink band were priced 99 cents each. The gray/green one was 59 cents. I guess whoever priced these didn't care for the dish on the bottom and figured it wasn't worth as much as the other two.


I went ahead and bought them. I'm thinking they would be cute to hold individual meatloafs or something. At least that is what I tell myself to justify yet another Pyrex purchase. Anyway, you can't beat the price. Cheaper than a candy bar these days.

Wishing you a great holiday weekend ahead. I probably won't be posting for several days as I am hosting Thanksgiving dinner and then on Black Friday I will most likely be heading back to the thrift stores as many have great 50% off sales on that day.

Happy Thanksgiving!
KayteeJane


Pin It

Best Blogger Tips

Friday, November 16, 2012

Get a Gobbler

I am drawn to vintage paper items - or ephemera as some call it. When I see vintage advertisements, post cards, greeting cards or food labels I will usually buy them. I love the vintage colors and pictures. It is like buying a small piece of art for very little money.

Here are a few that I've collected that I decorate with for Thanksgiving.

I especially love antique post cards. I have some for all of the major holidays. You can usually find a good selection of them at antique stores and flea markets. If not you can find several sources online where people scan the cards and allow you to download and print them.

I'm using a metal coil to hold the top card and a flower frog to hold the other.


This is a vintage flash card. Definatly not politically correct. Sorry if this offends anyone.


And this...
If you've been following this blog since the very beginning you have seen this before. I found it at a flea market. It is some sort of lottery/gambling card called "Get a Gobbler".


This card was never "punched" or "pushed".  Basically how the game works is you select your favorite girl's name listed on the card. If it matches the winning name on the card you win a free turkey. Some names are free while others cost a quarter. The winning name is hidden under the big red sun at the top of the card. Funny thing is I have never removed the paper sun to see what the winning name is.


Even more interesting than that are the names on the card. This gives a good indication of the era/age of this game. Names like Hilda, Gladys, Blanche, Irma and Olga are on the list. I don't know about you, but I haven't heard of any one naming their baby Olga lately.


Vintage paper items like these make interesting conversation pieces to decorate with. They are a nice reminder of the past.

Wishing all my readers a very Happy Thanksgiving!

KayteeJane

Pin It

Best Blogger Tips

Tuesday, November 13, 2012

Facebook Page

I decided to go ahead and make a Facebook page for KayteeJane's House. Seems like so many people connect on FB these days that I figured it would be a nice compliment to the blog. I hope to post shorter posts with pictures more frequently there - like if I'm in a thrift store and see something really neat I can just post right from my iphone without waiting to get home and write up a longer blog post.

So, if you want more frequent updates in "real time" about my junking adventures you can go to www.facebook.com/kayteejaneshouse and "like" the page. You can also just click on the orange Facebook icon to the right and that will take you there directly.

For those of you that don't Facebook - no worries! This blog is still my first love. I will be posting here a few times a week (at least) with longer posts and more pictures.

Thanks so much for the "likes". It is fun to see the numbers grow!

These beautiful Hydrangeas were cut the day before "Sandy" came to town. They are a magnificent purple and green color. By now the blooms outside are done and the leaves have turned an ugly, wilted black due to the colder temps. These remain on my coffee table - dried by now - but still a beautiful color. Now I just need to keep my cat from chewing on them!

Have a wonderful day. Thanks so much for visiting. I appreciate each and every one of you who chose to stop here amidst a sea of other online choices.

KayteeJane

Pin It

Best Blogger Tips

Friday, November 9, 2012

Thanksgiving Candles

Today I am sharing my favorite Thanksgiving decoration - these vintage Gourley candles. I love them because the large pilgrim woman and man sat on my Mom's Thanksgiving table when I was growing up and they remind me of her.


I've added to the collection over the years when I've seen them at yard sales or thrift stores. But the two original candles are still my favorite. You probably can't see it in the picture, but the pilgrim woman (in blue) melted a bit so that instead of standing upright her back is arched and she is now looking toward Heaven in prayer. Love that!


Do you have any sentimental items around your home that you decorate with? Maybe they came from someone dear to you or remind you of your childhood? I would love to hear about them. Let me know in the comments!

Have a great day!
KayteeJane

Pin It

Best Blogger Tips

Tuesday, November 6, 2012

Bring on Thanksgiving

I love Thanksgiving. It is one of my favorite holidays. I love how it is all about giving thanks, being with those that you love and enjoying a delicious meal together. I also love that it is a holiday without a lot of stress. It is one day, with not a lot of advance preparation.  As much as I am tempted every year to go straight into Christmas decorating once Halloween is done, I stop myself. I still want to enjoy the fall weather, the leaves and my favorite...the pumpkins. I'm not ready to give it all up just yet to snowmen and Santa - as much as I love those too.

Here are some decorations that I have out for Thanksgiving. I hope you are inspired to stop and enjoy this wonderful holiday along with me.

I've been crafting a lot with burlap lately. I really love it. Here is a banner I made out of burlap that is hanging from the mantle. I hope to share a tutorial about how to make them soon. I'm still loving the white pottery right now. The white cornucopia is a favorite score from this summer - only $1.00 at a thrift shop.


A burlap pumpkin that I made too.


Some felted pumpkins and a crocheted pumpkin.


These metal trays have become a mini collection in themselves. It started with the red tray several years ago and over time I have found a few more here and there. I love these trays and put them out every fall. They are useful too. I use them to serve cookies and snacks when I have company to visit.


A glass turkey made by L.E. Smith Glass in the 1990's. He is not old in age, but looks like a piece of vintage glass to me. I have one of these for sale in clear glass if you are looking for one. Click HERE to see it.


I found six of these English plates at a yard sale a few years ago. Good for serving pumpkin pie!


A vintage candy box.


Some old spice tins are also used for decoration.


There are a few more decorations to share. I will be showing them next time.

Thanks for stopping!

KayteeJane

Pin It

Best Blogger Tips

Thursday, November 1, 2012

Fabric Pumpkins

I recently made some pumpkins out of vintage fabric. I really love how they turned out. I did make some out of burlap (which isn't vintage) but I also made some out of old chenille bedspreads and a feed sack.

 
This one was made using a vintage chenille bedspread that is orange. I've kept it for years waiting for just the right project.


Remember this old feed sack (the one with the corn cob on it) that I bought for a dollar? You can read more about it here on THIS POST. Anyway, I cut it up and made some pumpkins out of it too.


These are fairly easy to make if you are interested in trying them. To make them you will need a football-shaped pattern/template. I drew one free-hand but you could probably create one on your computer using Word and then print it. My football is about 8" tall. The larger the football the bigger the pumpkin will be and the smaller the football the smaller the pumpkin will be.

After selecting your fabric, trace the pattern onto your material and cut out. Here I am tracing onto an old white chenille bedspread. For the seed sack pumpkin I used 8 pieces. For the chenille pumpkins I used about 5. Just play around with it to see how "fat" you want your pumpkin to be.


Once your pattern pieces are cut, you will sew them together. Sorry but I don't have a picture of this step. Basically you pin right sides together and sew two pieces together along one side. Keep adding pieces to your first two by pinning right sides together and sewing along one side of the football from tip to tip. As you add pieces you will see the pumpkin begin to take shape. When the last football is attached then sew the two sides of the pumpkin together. Leave about a 4" opening to turn the material right side out. Once it is right-side-out fill with stuffing. Here is a picture of all of my pumpkins stuffed and ready to be finished.


Before sewing shut I added a twig as the stem. Just coat the bottom of the twig with glue and insert into the center of the pumpkin down into the stuffing. Once the stem is dry and attached firmly, hand sew the opening shut. I then cut out a leaf from some other fabric and hand sewed that on as well. I added ribbon to each pumpkin to finish them off.


If you don't feel like making one of these yourself - or you like the material that I used - I am selling a few of these right here from my blog.To find them click on the link at the top of my page that says "Handmade for Sale" - or just click HERE.

I love how these turned out. I now have my own little pumpkin patch to enjoy year after year! I plan to be on the lookout at yard sales & thrift stores for vintage fabric to make more.

Thanks for stopping today!
KayteeJane

Pin It

Best Blogger Tips