Showing posts with label home decorating. Show all posts

Tuesday, August 19, 2014

Hoop Art


For several years now Hoop Art has been all over the internet. I think I first saw the idea years ago on the delightful blog Posy Gets Cozy. I googled it when writing this post and the picture appeared. I love how she makes fabric into art with a simple embroidery hoop!


Since I first saw that picture it seems like the popularity of hoop art has exploded. Creative women everywhere are making something unique with fabric and a hoop. Maps, sweaters, quilts, old t-shirts, burlap, vintage linens, embroidery, lace - it is made all the more lovely when framed in a hoop and hung for display.

I see hoops for sale all of the time at thrift stores and yard sales. They are so reasonable. I recently priced a new hoop at Michaels and almost fainted when I saw the price. Something like $12.99. When you are used to seeing them for sale at GW for around a quarter, full retail will knock you over every time.

A while back I found this super cute handmade baby bib at an estate sale.


The minute I saw it I thought it would be adorable framed in a hoop. I pictured a sweet Italian grandmother making this for her chubby-cheeked Italian grand baby. All I know is that my favorite comfort food of all time is Spaghetti {a.k.a. spaghette} I am Italian myself and I loved my Italian grandma. This bib begged to be framed and hung in my kitchen. So after holding on to it for a good 2 years with the intention of doing something with it, I finally did.

Here is how I did it in case you get struck with embroidery-hoop-fever and want to try your hand at it. It is a great way to use those sweet embroidered table scarves and such that you can find for pennies on the dollar at church sales and thrift shops that are too cute to leave behind but once you get them home you can't figure out what to do with them.

You will need 1 embroidery hoop, scissors and some hot glue. I opted to spray paint my hoop to match the embroidery but you don't need to do that step if you don't want to.


Split the hoop apart and lay the larger of the two hoops on the top of your fabric and the smaller of the two pieces under the fabric. Line up your fabric in the hoop as you would like to it be when finished.


 Next push the two hoops together and pull the fabric taut. It should be as tight as a drum. When you get it nice and smooth and taut tighten the brass screw at the top that holds the two hoops together.


Make sure it is where you want it to be before moving on to the next step.


Flip the hoop over to the "back side". If the fabric is where you want it to be trim the excess off leaving about an inch of fabric peeking out from between the two hoops.


Run a line of hot glue on the inside surface of the wood and then fold the excess fabric over the wood so that it sticks to the glue.


Now the back is neat and tidy and the cut fabric will not show when the hoop is hung. The glue keeps the fabric secure.


If you want to go one step farther, buy a piece of felt at the fabric store and cut it to the same diameter as the smallest hoop. When your hoop art is framed glue your piece of felt to the back of your work so that the back side of the embroidery {or fabric} is covered and doesn't show. I didn't get around to doing this step.

Here is the finished hoop hanging in my kitchen.


On a side note - I probably used a hoop that was a tad too large for the bib. As a result some of the red seam binding is showing. I used a size 14 because I found one for cheap at a sale and didn't want to purchase a new 12" hoop for full price. I have intentions of gluing some rick rack or something around the face of the hoop to cover that seam binding that is peeking through. {My OCD kicks in whenever I look at it and realize it isn't perfect.} I am however glad that I did at least get it framed and hung!

I hope you will try some hoop art for yourself and recycle some beautiful old embroidery or pretty fabric from your stash.

KayteeJane


Pin It

Best Blogger Tips

Thursday, July 3, 2014

Summer Decorating with Vintage

 I love to decorate around the house with vintage items. I change the decorations for each season/holiday. Here are some of my summer decorations.

I collect old planters. I put this Uncle Sam planter out for the 4th of July every year. Here it is filled with vintage flags.


Something my husband and I will always buy if affordable are vintage fans. We love them and use them throughout the house in the summer. Since we don't have air conditioning, these vintage fans really come in handy. Some of the fans are strictly for display, like this one. I recently found this small-sized fan at a garage sale. I love the name of it - Zero. I think it is cute sitting out for summer. The colors are great too.


This metal toy lawn mower was just purchased last Saturday at a yard sale. I have always loved vintage toys for some reason. I love to use old toys and children's furniture in my displays. The lawn mower is on my front porch.


Another thing I decorate with is vintage household items in their original packaging. You can find things like this at estate sales.  I found both the package of plastic forks and the pack of Ice Cream Sticks at estate sales. I especially like it when the packages have the original prices. It is neat to see how much stuff cost 40 or 50 years ago. I just sit things like this out on my china cupboard or in my kitchen and they add interest.


I also like to decorate with vintage linens. I found this amazing embroidered linen doily at a yard sale years ago. Since I have two daughters that are obsessed with anything mermaid, I had to have it. I always thought it would look cute made into a pillow or just sitting as a doily on the top of a little girl's dresser.


I also like keeping vintage books. This is an old book from 1960 discarded from a local elementary school.


Since my kids don't seem to know too much about American History - which I discovered when I asked them why we celebrate the 4th of July - I made Hannah sit and read some of this book.


This summer I joined a CSA in my community. CSA stands for Community Sponsored Agriculture. Here is my weekly share of eggs - sitting in Pyrex. I am always using my Pyrex bowls in the kitchen no matter what the season. I even change which bowls I use to match the colors of the particular season or holiday I am celebrating. That is how crazy I am for Pyrex.


I love the freckles on the eggs!


Here's wishing you a happy 4th of July and fun summer days ahead!
KayteeJane


Pin It

Best Blogger Tips

Sunday, October 6, 2013

Wheeled Vintage Cart

You may remember several posts back where I posted about some projects that I wanted to complete. Click HERE to see the original post.

I was able to finish one of the projects - the wheeled cart.
Here is the before picture:
Here it is after:
I am using it for a desk cart. It sits next to my desk to hold supplies. This keeps my desk top clean so that the kids can do their homework there.

While I was spray painting I decided to do the tape dispenser.
In case you are wondering I chose this paint. My hubs was the one who did the painting. He actually complained a lot about the quality of the paint so I'm not endorsing the paint - but the color is pretty.

One down, a lot more to go!
KayteeJane


Linking this post at Ivy and Elephants - stop by for lots of inspiration!

Pin It

Best Blogger Tips

Tuesday, June 18, 2013

Lamp Shade Re-do

Over the years I have purchased a few antique cast iron bridge lamps at estate sales. They are nice lamps - very heavy cast iron, decorative and vintage for my style. The only draw back to buying these lamps is finding shades for them. The hardware that attaches the shade to the lamp is different than the lamp shades sold on the market today at main stream stores like Target. So essentially if you want a nice new shade for your old lamp you have to find someone who specializes in lamp shades {i.e. - pricey} or find a vintage one. Luckily, two of the lamps that I bought already had shades on them. I thought the shades were ugly but they fit the lamp. Eventually I decided to make them over on the cheap so that they would better fit my home decor. Following is a tutorial on how I jazzed up one of the shades. You could do this technique on any plain shade. I see lots of boring & dated {i.e. ugly} shades/lamps for sale at yard sales. They are usually sold for a fraction of the cost of a new lamp/shade. So if you are looking for something custom without spending a lot of money try this...

Here is the finished shade on the lamp.
My theme for this shade was "Faith, Hope, Love". You could pick any words/phrases you like. I even thought of doing an initial or a number.
This is the shade before.

For this re-do you will need:

* ugly lamp shade
*foam alphabet stamps {mine are several years old made by Making Memories brand for scrapbooking}
*paint
*paint brush
*ribbon
*hot glue & gun

To begin I removed the old trim from the lamp. It just pulled off.
Next I decided what words I was going to stamp on the lamp and then got the letters ready. I happened to have 2 different font sets of the foam letters so I decided to do the words Faith & Love in one font and the word Hope using another font/color.
I decided to use black & white paint for my letters. I just used basic acrylic paint found at Michaels or JoAnn. You will also need a paint brush to apply the paint to the letters.
 
Apply a thin coat of paint to your letter and then position it where you want on the shade. Press firmly so that the entire letter is stamped. If you look closely at my finished shade you will see that it is not perfect. It is pretty difficult to get a perfect imprint every time. Just know this from the outset so that you know what to expect. You will also notice some random paint marks here and there. This can also happen when stamping when paint gets on the stamp {not the letter} and then makes a mark when you imprint.
I continued stamping the words around the shade in the following order: Faith, Hope, Love. Between each word I also stamped a flower. At the end of some rows I didn't have enough space for the flower. Each row is slightly different and imperfect. I was able to get 4 complete rows around the lamp.As I mentioned earlier I decided to do Hope in a different font and color for more variety.
 
Once the shade was finished being stamped I let it dry overnight. The next morning I added black grosgrain ribbon to the top and bottom of the shade using hot glue. I also added some vintage lace trim to the bottom of the lamp over the black ribbon. I just used what I had on hand.
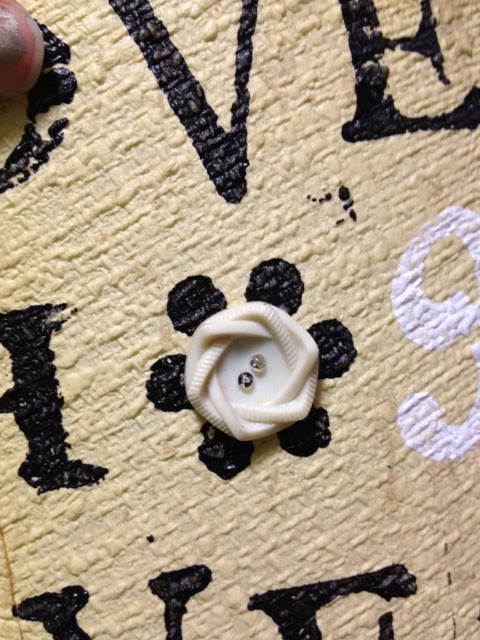
I also added some white vintage buttons over the stamped flowers. I attached these with hot glue. They don't all match. I picked what I had in my button stash.
That is all. It took me about 2 hours from start to finish to complete.
I also wanted to show the other shade that I transformed. I did this one a few years ago and don't have any pictures of the process. The shade looked about the same as the other one before I started. I had a vintage doily that I wasn't using. I cut it so that it would fit around the shade without any excess overlap - just enough that I could fold it over the top and bottom. Once I had it to size I glued it to the shade using fabric glue. Done! This has held up well for several years. The kids have even dropped this lamp a few times on the floor and warped/cracked the shade. I guess the doily has helped to keep it together because it is still being used right now.

 
I hope you will give this a try sometime!

KayteeJane


Pin It

Best Blogger Tips