Each Christmas I try to make many of the gifts that I give instead of buying them. I do this for two reasons. One, to save money and two, because I enjoy doing something special and personal for the people on my list. I really enjoy creating gifts and it satisfies the creative person inside of me.
With a dollar having to stretch longer than it ever has, I am coming up with several ideas of simple & easy gifts that can be made on a budget. I am planning on sharing all of my ideas here on my blog over the next weeks. Today I am showing gifts you can put together using things that can be bought in just about any thrift store. I do not think these gifts are tacky or sacrifice style at all, just because some parts of them came from a thrift store. In fact I think they turned out very nice and I know I would be happy receiving any of these things. And by making gifts like these instead of buying "new", we are doing something good for the environment by reusing. So be unique! I challenge you to try one of these ideas for someone on your list - a teacher, a friend or a neighbor perhaps?
Project #1 - Forced Bulbs
(Click on picture for original souce.)
I love forcing tulip and paperwhite bulbs. Here in Pennsylvania they are a welcome bit of color and freshness during the winter months. Forced bulbs make nice gifts too. You can buy a pre-made gift package for forcing bulbs from Target complete with a pottery dish & bulbs. However, since I like to do things my own way I am going to make these myself using vintage & recycled containers and for a lot less money!
At thrift stores look for glass & pottery bowls, planters & dishes that would be good for forcing bulbs. Here are some pottery planters that I have collected.
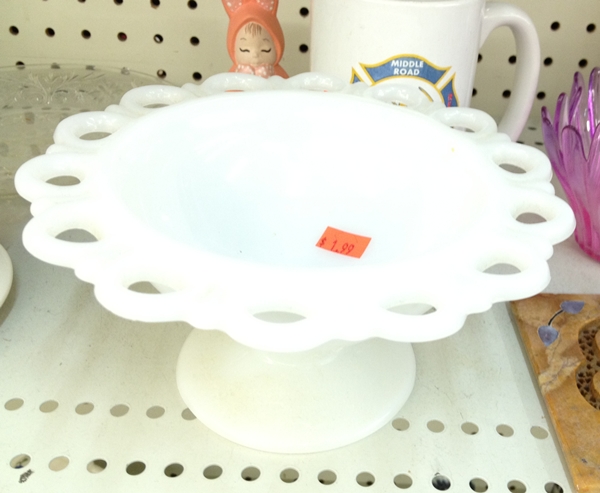
Milk glass is a beautiful container for paperwhites. At my trip to the thrift last week I spotted this milk glass dish for $1.99.
Here are some other containers that I have collected - all of which would work to hold the bulbs. The more unique the better. Think outside the box.
To make the gift, you will need some rocks or stones for the bottom of the container. I found these bags at Dollar Tree for a dollar each. You will mostly likely need one bag of rocks for each container you are using unless it is a larger container and then you will need two.
Look around at discount stores or gardening centers for packs of bulbs. I found these red tulip bulbs for $2.50 a package. There are 8 bulbs in a pack - enough to make 2 or 3 gifts.
Fill the bottom of your container with the rocks. Place the bulbs on the top of the rocks nestled in so that they don't fall over. If you do this now (a month before you give the gift) you can begin to grow these at home and then give the gift with the flowers in bloom. If you decide to do that, add water to your rocks (not overflowing) and place the dish in a sunny/warm location. The flowers will begin to grow. OR you can wait and give the gift with the bulbs just starting. If you do this, don't add water. Just package the bulbs as shown below. Doing it this way is nice too because the recipient can then grow their own flowers in January when we all need a little bit of spring to brighten the days.
Here is one bulb packaged in a vintage drinking glass. I used clear pebbles for this one.
Remember that once the bulbs are done growing the gift recipient can keep the container for later use and also plant the bulbs in their garden!
Each of these gifts cost me less than $5 each.
Idea #2 - Beautiful Soap Dish
I love antique dishes. I frequently see singles - ones that don't come with a complete set - for sale at thrift stores & antique stores.I use a pretty antique plate as a soap dish in both my kitchen & bathroom. Here are two dishes that I am using for my gifts.
For my gift I am buying handmade soap to go with the dish. My friend Julie made the tree shaped Spruce soap shown below. I love how it looks on the red and white transferware plate. If you can't find any handmade soap, TJ Maxx and Marshalls sell great soaps at reasonable prices.
This gift cost me $5.
Idea #3 - Drinks with Style
Glassware abounds at the thrift store. Much of it is in great shape and sells for pennies on the dollar. If you are going to dinner at someone's house and typically bring a bottle of wine, why not pair it with some nice wine glasses that you found at the thrift store. I have no misgivings about buying glassware second hand. I look it over to check for chips and scratches. If it looks good then I know I can take it home and put it in my dishwasher to get it nice and clean.
When shopping for glassware, keep your options open to what may be available at the thrift store and then base your gift around what you found. Just last week I saw these Margarita glasses for sale. Package these along with some Margarita salt and Margarita mix for a cute gift.
I also saw these. I thought they were pretty cute with their hobnail base. They only cost 39 cents each. I would pair several of these glasses with a bottle of champagne. - This would make a nice New Year's gift.
I also saw these. Very retro! I'm thinking Mad Men all day. These would be great along with a bottle of flavored liquor, whisky or what you would need to make a martini. Include some cocktail stirrers and some fun paper cocktail napkins. Only 99 cents each for beautiful vintage glasses!
If you don't want to do alcohol, how about a Root Beer Float Basket? I found these small-sized beer mugs at the thrift store. I bought these red & white straws at Dollar Tree in the Christmas aisle.
Pair the glasses and the straws with some ICB Root Beer and a pint of good vanilla ice cream for a sweet gift idea - all for about $10 if you include the ice cream & root beer.
If you are crafty, here is an idea that I saw on Pinterest last year. You could do this with any stemmed glassware.
(Click on the picture for the original link.)
Idea #4 - Food Packaging
You can find a great assortment of glass containers at the thrift store that would be beautiful for holding your home baked cookies, fudge, snack mix or candy. Much prettier than a disposable foil or plastic container and much cheaper than buying new. Fill with your homebaked goodies and tie with a ribbon.
Here a some examples of containers found at thrift stores or antique stores that would be beautiful for packaging food:
Look for glass cake plates to hold fruit cake. Glass jars to hold snack mix or cookies. Tins to hold candy or fudge. Loaf pans or vintage Pyrex to hold a loaf of bread or a cake.
So there you have it. I hope you have been insired to shop at your local thrift store this holiday season to find gifts for the people on your list. You will be helping the environment, helping the charity that runs the thrift store & helping your wallet. Not to mention you will be giving a gift that is unique and one of a kind.
If you have any other ideas of gifts from the thrift - please share them with us in the comments. I would love to hear what ideas you have!
Next time...how many gifts can you make from an old wool sweater? Join me to see what I come up with!
KayteeJane


.JPG)


.JPG)