Showing posts with label home improvements. Show all posts

Wednesday, September 28, 2011

The Yellow Playhouse

When I was a little girl I was so envious of another girl who lived on my street. You see, she had a cool little playhouse in her backyard that was painted pink and sported a dutch door. Although I grew up pretty spoiled - we even had a pool - I always longed for a playhouse. What little girl doesn't?

When I became a mom to two little girls of my own, I thought about that playhouse again. My husband promised me that he would build our girls one. It seemed like such a huge undertaking to build one from scratch and years went by and we never seemed to have the money or time to start it. Both girls worked their way through elementary school and still no playhouse. We decided that we had better get that playhouse built or the girls would be too "old" to enjoy it.

Finally last summer the playhouse became a reality.

Take a look from start to finish.


The framework


This is what it looked like with almost everything on the exterior finished and painted. The color is the same yellow as our house.


We gave it the house number 610 1/2 because our real address is 610.

A little porch light. It actually works.


All lit up at night.

Of course the inside is just as cute as the outside. I made sure to fill it with some vintage dishes and decor found at yard sales. What fun! Maybe I'll post some pics some time.

I think once the girls are done using it I may just move in myself.

KayteeJane


Pin It

Best Blogger Tips

Wednesday, May 18, 2011

Painting

Seems like I am always doing some painting around here. This week I am enjoying some time off from work so I decided to paint our family room. We affectionatly call this room "The Red Room" because I painted it a bold red when we first moved into our house. No, it is not a scary room like in the movie "The Shining"!
Although I love the color red, I am ready for a change.
I didn't take any "before" photos but you can see the red at the top of the wall where I haven't painted yet. The white paint is primer. From what I have read on the internet, red paint is the trickiest color to cover, so that is why I decided to do a primer coat. It was also the trickiest to apply. It took over 4 cans of red paint to cover this tiny room and it still never really looked finished. I just quit after 4 cans because I was tired of spending money on paint.

The new color I chose is a light beige. Even with the primer on the walls the room looks bigger. As a person who typically buys bright colors of paint, this is a departure. Recently I have seen so many great looking rooms where the color scheme is neutral. The rooms look so fresh and comfortable, so I'm giving it a try.
Because we have been experiencing tons of rain here, I'm not sure how long the paint will take to dry. The people at Lowe's advised me not to paint today. I don't think I'm going to listen.  I see a ray of sunshine and some blue skies so I'm just going to go for it. Hopefully I will be back with more photos in a day or two.

Until Then,
KayteeJane

Pin It

Best Blogger Tips

Saturday, April 30, 2011

Hooked on Hooks

Over the years we have collected a lot of old hardware and hooks. We usually buy them when we see them at auctions or estate sales if they are affordable.  When you are restoring an older home back to it's original style, you are always on the look out for things that might have been in your home originally. When we buy them, we often don't even know what we will use them for at the time and just keep them until inspiration hits. Here are some that we have used.

Acorn Hooks:
Found these in a box lot of old hardware. Because we live in a town know for it's oak trees, these were perfect for us.


Mark made me this to hang aprons on in the kitchen.


Tack Hook or Harness Hook:
This huge hook was also part of a box-lot of stuff scored at an estate auction. It would have originally been used in a barn to hold a harness or other stable equipment.
We weren't sure how we were going to use it when we bought it, so it sat in the basement for awhile. I'm actually surprised we held on to it because it looks sort of dangerous.


Recently we saw a picture on the internet of someone using a similar hook to hold dishtowels. BINGO! We promptly hung it in our kitchen. It is mounted under the shelves close to the sink.


More old hooks:


Mark used these hooks for another coat rack. Our front door opens right into our living room. There isn't a foyer or even a coat closet. Before we made this, we didn't have any place to put coats, jackets, purses or bookbags except on the floor.


Metal Hook Rack:
This is another interesting thing picked up at some sale. We spray painted it white. It is all one piece and made of metal. It hangs in my bathroom and hold towels.


Keep your eye out for interesting hooks and hardward at your next flea market or estate sale. They can be expensive to buy online or on ebay. They really add character to your old home.

KayteeJane


Pin It

Best Blogger Tips

Tuesday, April 26, 2011

New Kitchen

Welcome to our new kitchen! After 6 months of hard work, washing dishes in the basement and cooking on a hot-plate, it is finished.

Last week I was off for Spring Break and we worked day and night painting, cleaning, unpacking boxes, moving things and finishing up all of the final details.

Here are the pictures. I am no professional photographer, so some of these pics are a little dark. Also, I apologize in advance, but this will be a long post :)

BEFORE
This is what the kitchen looked like when we came to see the house prior to buying it.
Metal cabinets with a wood-grain overlay, wall paper, heavy draperies and brown shag carpet!


AFTER
All fresh, clean, new and white!


The left-side before.


The left-side after.


Vintage locker baskets sit on top of the cabinets.


My collection of vintage Pyrex. I will really be using these - a la Rachel Ray.


Going Green - Vintage dish towels will replace paper towels.


The right-side before.
There was a window on this wall. We bricked it in.


The Right-side after.
With the window gone we have more storage and counterspace.


Wood shelves built by Mark.
After years of collecting cake plates and vintage glassware, I can now display these beloved treasures on the shelves to use and enjoy.


I don't want to have very much sitting on the counters.
These vintage canisters are the exception.
After cooking in such a tiny space for so long, I am really enjoying having room to work.


Undermount deep-bowl Stainless Steel sink. Didn't Mark do a great job with the Corian?
Our old kitchen didn't have a garbage disposal. Now we do!


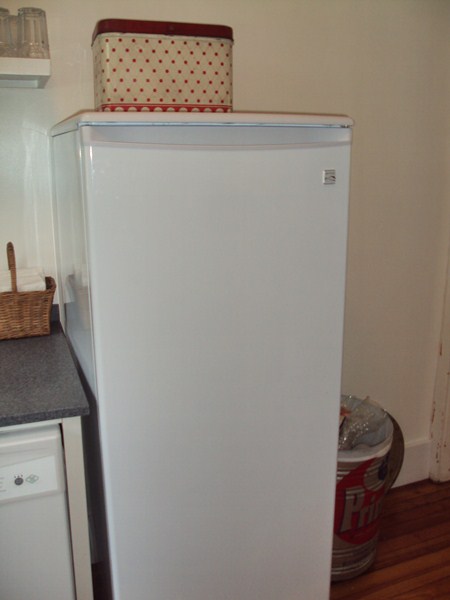
A new, smaller refrigerator. The older refrigerator has been put in the basement to store soda and other groceries that don't fit in this European-sized fridge. We decided to go with this small refrigerator for now because it doesn't take up much space in the room.


A school house light.
The milk glass globe was purched for $1 at Construction Junction.
The cast-iron mount was purchased on ebay.
The ceiling was covered in v-board wood and painted white for a cottage look.


Knobs.
After much thought, we chose these drawer pulls and knobs. We found them on the internet.


We had previously purchased an original (from the 1800's) version of this drawer pull a few years back from an estate auction. When the kitchen cabinets came we looked at several different styles of pulls but didn't love any of them. Remembering that we had some old hardware in the basement, we looked at what we had. Liking the look of this pull, we wished that we could find something similar to it. Lo and behold, after searching around online Mark found someone on ebay selling exact reproductions of that original pull.

A "spice rack" sits next to the stove. Miniature drawer pulls, that match the larger ones, are on these drawers. I am using this to store kitchen gadgets. 


These knobs match the pulls. They have a raised floral design. They were purchased from a different company.


Some people questioned our decision to use open shelving instead of door-front cabinets. This pantry makes the open-shelf concept livable. It holds a lot of dry goods, paper products and groceries. Oh, by the way these cabinets are Martha Stewart brand - sold at Home Depot.


A countertop to sit and eat at. It folds down when not in use because it is located between two doorways.


The shelf above. I asked Mark if he thought it looked like Cracker Barrel in here...he said "no". Thank goodness.  (No offense to CB - I do love your Hashbrown Casserole -)


Trying to be organized...I've always wanted a chalk board in my kitchen.

Fun Stuff....
I've had boxes of things sitting in my basement for 5 years. That is how long we have lived in this house. Knowing that we would be tearing out the kitchen eventually, I never unpacked much of my kitchen wares after we moved in. On Saturday, Mark brought up all of the boxes. Let me tell you...It was like Christmas in here!
Everything was washed and then inspected to see if it would make "the cut".
I picked what I wanted to keep and the rest is to go. Some has already been given away, some will be donated and some will be for sale at an upcoming flea market.

Here are some of the things I decided to keep...

Jadite tumblers scored at a St. Vincent de Paul thrift store and a set of vintage Anchor Hocking mugs.


A vintage paper towel & wax paper holder. This was bought on ebay. It is mounted on the wall and holds a real roll of paper towels.


Mark converted this old shortening tin into a garbage can by adding wheels to the bottom and a handle to the lid. This baby cost me $3 at a flea market last year.


An old wooden recipe box holds some of my late Grandma Kate's recipes.


A recipe for one of her famous Italian desserts, Polenta Dulce (Sweet Corn Mush) written in her own handwriting.
I plan to make some of this soon, now that I have a place to cook again.


Thank you for visiting and allowing me to brag a little about this space. It has been a long time coming, but well worth it. Thank you to Mark (my honey) who did ALL of the work.

Check back tomorrow when I lay out how much this project actually cost. I am going to tally it all up and share it with the world. That is one thing I love about blogs, you can learn so much from real people and real life situations. So I want to pass on what we have learned throughout this process to you.

Until then,
KayteeJane

Pin It

Best Blogger Tips

Friday, December 31, 2010

Happy New Year & A Look Back

Before moving on to a new year, I wanted to share with you some of the transformations that have occured here at our house in 2010.

We bought this little house in 2007.
Here is what it looked like when we first saw it - For Sale sign and all.

We had looked around for a while and were finding nothing in our price range that we liked. This little cottage house came on the market and we were the first to look at it. Every - and I do mean EVERY - room needed redone. We decided to take the plunge knowing that we could fix it up ourselves. (You see I married someone who knows how to do stuff...I ain't no dummy!)

That first summer we redid the dining room, living room, and bedrooms so that we could move in and live here while finishing up the rest.
Here are some of the cool things that happened this year.

Bookshelf Project


The previous owners had removed the fireplace that was originally on this wall and then covered the entire wall - windows included - with drywall and a painted mural.

When we first looked at this house I didn't even realize there were windows in this wall until later when we were driving by the house and I saw them from outside!
We ripped down the mural, put up new drywall, uncovered and redid the windows and added wood trim.

Above picture taken 2007 - after drywall is put up.


Armed with a Lowe's gift card (thank you Lee & Frannie) and Mark's skills we built this bookshelf in a weekend.


Finished!


New Windows in Our Bedroom

This is what our bedroom windows looked like before:


Not bad, but you couldn't open 2 out of the 3 windows for fresh air.
We decided to replace them and here is the finished look.


New Roof & Siding

July came with a total home transformation, thanks to a new roof and new siding.
Here is a pic of this poor little house before:


People laughed at us when we told them we wanted yellow siding.
I think it turned out nice.


The finished result.
We decided to remove the porch railings and I love how it looks.
The year before we removed the garage door and driveway, filled it in, and we now have a large front yard.


Playhouse

For years now Mark and I have wanted to give the girls a playhouse. 
Mark put alot of thought and preparation into this project, wanting to make it just right for his two princesses.
Here is how it looked the first day as the walls went up.


The finished product - lights & all!


This year we hope to finish our kitchen and do some work to the basement to turn it into another living area.
We hope you will come along with us on our journey by visiting here often.


I wanted to leave you with this picture of Hannah, Gaby & friends playing a game called Hedbanz.

 If you are planning a fun family night this New Year's Eve (or anytime), get this game. It is a blast! The kids and I giggled the entire time we were playing it
(Thanks to Naomi - Hedbanz ringer!)

Thanks for stopping by!
Happy New Year
Love,
Katie


Pin It

Best Blogger Tips