Showing posts with label my house. Show all posts

Wednesday, June 5, 2013

Hannah's "new" dresser

I recently posted about my daughter Hannah's bedroom redo and how I was selling her lovely "shabby sweet" furniture. Read the original post HERE.  I have since sold the furniture off to new homes and her room has been redone. She originally wanted IKEA furniture to replace the pieces I sold. We were planning on buying her something from there but as luck would have it hubby stumbled upon an old dresser in someone's trash and put it in the back of his truck.  Old habits die hard around here. Once a trash picker, always a trash picker. I wish I would have gotten a "before" picture of it. (I am terrible at remembering to do that). The dresser was pretty darn ugly. Visualize a little boy's room circa 1960. There was even a Conestoga Wagon made of wood glued to the front of one of the drawers! Ugly aside -the dresser is SOLID WOOD - which you can't say about IKEA stuff - so we decided to take a chance and paint it. This picture shows how it looked right before painting (without the drawers). I took a pic of the Conestoga Wagon (shown below) just to prove that it actually exsisted!


Hubby uses a paint sprayer now to paint all of our projects. The end result looks very professional - and it is much quicker and easier to do. I would recommend painting this way to anyone who paints furniture. Here are some pictures in process. Paint - Clark & Kensington from Ace Hardware


Finished Dresser - We added an old mirror that was also found in the trash previously. I love the bright aqua she chose. I think it looks great against the green bedroom walls. This is a small-sized dresser, which is perfect for an 8 year old. The best part is the final price tag - $15 for paint and $30 for knobs. Much cheaper than buying brand new furniture. Plus, if she beats it up, spills on it or writes on it (which she has been known to do) I won't be as upset as I would normally be if I had spent $250 +.

 
(dresser knobs from Target)

Here are some pictures of the rest of the bedroom.

Chalkboard Wall. I painted one wall in each of my daughter's bedrooms in chalkboard paint. It took 2 coats to cover the wall. The girls enjoy writing notes to each other on their walls and Hannah enjoys playing school. The only down side is it does create a lot of chalk dust on the floor. We have hardwood floors in the bedrooms so I'm not too worried about it because it is an easy clean up. Not sure how I would feel with carpeting.
 
I snuck a little vintage in by using an old bedspread as a dust ruffle.

The final result is a very bright & cheery room. I love how it turned out. All furniture is second-hand, thrifted or found.

KayteeJane


Pin It

Best Blogger Tips

Monday, September 12, 2011

Enjoy the Small Things

For some reason I am drawn to small-sized objects. I have a printers tray hanging on my wall where I display interesting, tiny things.


When I find small things that are interesting I add them to the tray. To me this is what makes decorating a home fun...and personal. When you come to my house you will see all sorts of things out on shelves and on display - I put out those items and treasures that are a part of my journey - things that I find unque or that mean something to me and my life.

Here are some you would see if you came to visit...

A metal "Bob Pin" holder. I love how Bobby Pins were once sold in a metal case.

Miniature Bibles.
I wonder who decided what scriptures would make the cut and which ones wouldn't?


A very small clothespin.

A tiny doll with a crocheted dress. She is no bigger than the size of a quarter.
I wonder if someone hand-stitched her outfit?

I also have a pottery bowl that sits on a shelf that is filled with keys and other "what nots". I bet many of you have something similar in your home - either in a drawer or out on display.

Here is what is in there - a pink dart, a compass, old keys, a hole punch, a bottle cap, another clothespin and some dice.
My daughter Hannah loves to touch and play with this stuff.
Who needs toys when you can play make-believe with old keys and other junk?


I also like to collect things with our family initial.

What small things do you collect?
I challenge you to bring these things out and put them on display.
Enjoy those small momentos and trinkets that you've collected over the years.

KayteeJane

PS: Today is the last day to enter the Vintage Purse giveaway. If you haven't entered yet, go to this post and leave a comment before midnight tonight. Thanks and good luck.


Pin It

Best Blogger Tips

Friday, August 12, 2011

Pillow Talk

I had a burst of creative energy yesterday so I decided to stitch up some pillows that have been on the "to do" list for several years. (yes years!)

Union Jack Pillow -
I have always wanted one of those Union Jack pillows made so beautifully by Shabby Chic. I love all things British so I decided to try and make one myself and I love how it turned out.

I started with the traditional red & blue colors.
Here is the finished pillow. I wanted the stripes to be "ragged" so their edges are frayed. I've had that rhinestone crown pin for years and thought this was the perfect use for it.
I think I may try to make another one of these using muted colors like taupe & white.

I've also collected vintage seed & flour sacks for years with the intention of making pillows out of them. Here are some of the ones I've collected that were finally made into pillows last night.
 

Here is what they look like as pillows.


I have also saved several vintage embroidered items that I love with the hope of making them into something useful someday. There are only so many doilies you can put on your tabletops.

Here is the embroidered dishtowel I found at the flea market last month made into a cute little pillow. I think this would be cute in a baby's room.

This vintage laundry bag is too small to use for actual laundry. I decided to fill it and stitch it closed. I kept the loop handles on the top for a cute touch. I love how the girl is hanging up cute undies on the line.
 

I didn't have to spend any money to finish these pillows. All of this was made with materials that I had on hand just waiting to be used. The fiber fill for inside the pillows came from some ugly old couch pillows from a couch that I don't even own any more. I remembered that I had the pillows stored in my attic. I cut them open and used the filling inside. It was in perfect shape. Love when I don't have to give JoAnn any more of my cash!

On a sad note my old Kenmore sewing machine bit the dust last night. It was a Christmas present from my parents one year when I was in college. Now I'm on the look out for one to buy at a yard sale.

Thanks for stopping today to see my projects!
KayteeJane


Pin It

Best Blogger Tips

Thursday, May 26, 2011

Finished

I have finished painting my family room. Gone are the dark red walls and sectional sofa. The "Red Room" is now just "The Family Room".


This is a small room. The lighter walls and new furniture make it feel bigger. This is the room where we watch television and spend most of our time together.


We got rid of our tan sectional sofa. I will never buy another sectional again. They are just so big and bulky. We offered it up for free on Craigslist and got 15 calls within the first 10 minutes after posting it. Crazy! In its place are 2 EKTORP couches from Ikea. Love the removeable slip covers on those couches...perfect for a home with 2 kids. These were bought used from Craigslist.

The shelves have been filled with collectibles and family photos.

Some of my cream colored pottery and my collection of vintage cameras & old glass inkwells.

This is my collection of metal picnic tins. Years back I saw a similar collection on the pages of Martha Stewart Living. I swear that magazine has inspired so many collections for me over the years. I don't see these around too much at flea markets or yard sales. I usually scoop them up when I see them.

My hubby works for a sign manufacturer. Sometimes he brings home some neat things that are being discarded. This H sign was taken off the side of a bank building to make way for a new sign.

Old washboards replace traditional art.

Thanks for taking a tour! I enjoyed your visit.
XOXO,
KayteeJane


Pin It

Best Blogger Tips

Wednesday, May 18, 2011

Painting

Seems like I am always doing some painting around here. This week I am enjoying some time off from work so I decided to paint our family room. We affectionatly call this room "The Red Room" because I painted it a bold red when we first moved into our house. No, it is not a scary room like in the movie "The Shining"!
Although I love the color red, I am ready for a change.
I didn't take any "before" photos but you can see the red at the top of the wall where I haven't painted yet. The white paint is primer. From what I have read on the internet, red paint is the trickiest color to cover, so that is why I decided to do a primer coat. It was also the trickiest to apply. It took over 4 cans of red paint to cover this tiny room and it still never really looked finished. I just quit after 4 cans because I was tired of spending money on paint.

The new color I chose is a light beige. Even with the primer on the walls the room looks bigger. As a person who typically buys bright colors of paint, this is a departure. Recently I have seen so many great looking rooms where the color scheme is neutral. The rooms look so fresh and comfortable, so I'm giving it a try.
Because we have been experiencing tons of rain here, I'm not sure how long the paint will take to dry. The people at Lowe's advised me not to paint today. I don't think I'm going to listen.  I see a ray of sunshine and some blue skies so I'm just going to go for it. Hopefully I will be back with more photos in a day or two.

Until Then,
KayteeJane

Pin It

Best Blogger Tips

Tuesday, April 26, 2011

New Kitchen

Welcome to our new kitchen! After 6 months of hard work, washing dishes in the basement and cooking on a hot-plate, it is finished.

Last week I was off for Spring Break and we worked day and night painting, cleaning, unpacking boxes, moving things and finishing up all of the final details.

Here are the pictures. I am no professional photographer, so some of these pics are a little dark. Also, I apologize in advance, but this will be a long post :)

BEFORE
This is what the kitchen looked like when we came to see the house prior to buying it.
Metal cabinets with a wood-grain overlay, wall paper, heavy draperies and brown shag carpet!


AFTER
All fresh, clean, new and white!


The left-side before.


The left-side after.


Vintage locker baskets sit on top of the cabinets.


My collection of vintage Pyrex. I will really be using these - a la Rachel Ray.


Going Green - Vintage dish towels will replace paper towels.


The right-side before.
There was a window on this wall. We bricked it in.


The Right-side after.
With the window gone we have more storage and counterspace.


Wood shelves built by Mark.
After years of collecting cake plates and vintage glassware, I can now display these beloved treasures on the shelves to use and enjoy.


I don't want to have very much sitting on the counters.
These vintage canisters are the exception.
After cooking in such a tiny space for so long, I am really enjoying having room to work.


Undermount deep-bowl Stainless Steel sink. Didn't Mark do a great job with the Corian?
Our old kitchen didn't have a garbage disposal. Now we do!


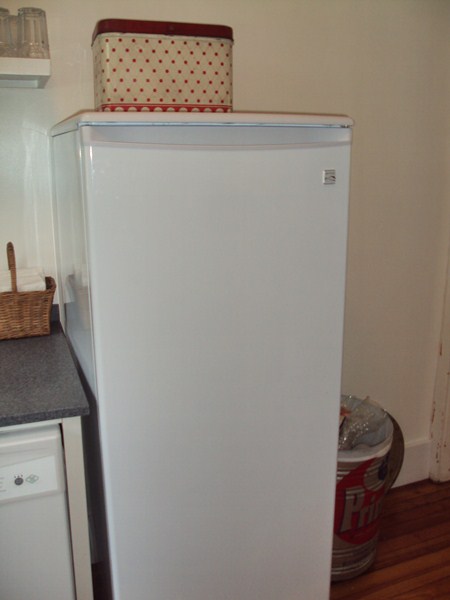
A new, smaller refrigerator. The older refrigerator has been put in the basement to store soda and other groceries that don't fit in this European-sized fridge. We decided to go with this small refrigerator for now because it doesn't take up much space in the room.


A school house light.
The milk glass globe was purched for $1 at Construction Junction.
The cast-iron mount was purchased on ebay.
The ceiling was covered in v-board wood and painted white for a cottage look.


Knobs.
After much thought, we chose these drawer pulls and knobs. We found them on the internet.


We had previously purchased an original (from the 1800's) version of this drawer pull a few years back from an estate auction. When the kitchen cabinets came we looked at several different styles of pulls but didn't love any of them. Remembering that we had some old hardware in the basement, we looked at what we had. Liking the look of this pull, we wished that we could find something similar to it. Lo and behold, after searching around online Mark found someone on ebay selling exact reproductions of that original pull.

A "spice rack" sits next to the stove. Miniature drawer pulls, that match the larger ones, are on these drawers. I am using this to store kitchen gadgets. 


These knobs match the pulls. They have a raised floral design. They were purchased from a different company.


Some people questioned our decision to use open shelving instead of door-front cabinets. This pantry makes the open-shelf concept livable. It holds a lot of dry goods, paper products and groceries. Oh, by the way these cabinets are Martha Stewart brand - sold at Home Depot.


A countertop to sit and eat at. It folds down when not in use because it is located between two doorways.


The shelf above. I asked Mark if he thought it looked like Cracker Barrel in here...he said "no". Thank goodness.  (No offense to CB - I do love your Hashbrown Casserole -)


Trying to be organized...I've always wanted a chalk board in my kitchen.

Fun Stuff....
I've had boxes of things sitting in my basement for 5 years. That is how long we have lived in this house. Knowing that we would be tearing out the kitchen eventually, I never unpacked much of my kitchen wares after we moved in. On Saturday, Mark brought up all of the boxes. Let me tell you...It was like Christmas in here!
Everything was washed and then inspected to see if it would make "the cut".
I picked what I wanted to keep and the rest is to go. Some has already been given away, some will be donated and some will be for sale at an upcoming flea market.

Here are some of the things I decided to keep...

Jadite tumblers scored at a St. Vincent de Paul thrift store and a set of vintage Anchor Hocking mugs.


A vintage paper towel & wax paper holder. This was bought on ebay. It is mounted on the wall and holds a real roll of paper towels.


Mark converted this old shortening tin into a garbage can by adding wheels to the bottom and a handle to the lid. This baby cost me $3 at a flea market last year.


An old wooden recipe box holds some of my late Grandma Kate's recipes.


A recipe for one of her famous Italian desserts, Polenta Dulce (Sweet Corn Mush) written in her own handwriting.
I plan to make some of this soon, now that I have a place to cook again.


Thank you for visiting and allowing me to brag a little about this space. It has been a long time coming, but well worth it. Thank you to Mark (my honey) who did ALL of the work.

Check back tomorrow when I lay out how much this project actually cost. I am going to tally it all up and share it with the world. That is one thing I love about blogs, you can learn so much from real people and real life situations. So I want to pass on what we have learned throughout this process to you.

Until then,
KayteeJane

Pin It

Best Blogger Tips